Ingredients
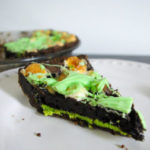
Grasshopper Pie
- 1 recipe Mint Cheesecake Filling (recipe follows)
- 1 recipe Brownie Pie (recipe follows)
- 1 recipe Mint Glaze (recipe follows)
- 2 Tbs. mini chocolate chips
- 1/2 cup mini marshmallows
Thin Mint Crust
- 1 1/2 cups crushed Thin Mint crumbs
- 1/4 cup milk powder
- 2 Tbs sugar
- 3/4 tsp. kosher salt
- 4 Tbs. unsalted butter, melted, or as needed
- 2 tablespoons- ¼ cup heavy cream
Mint Cheesecake Filling
- 2 ounces white chocolate
- 2 Tbs. grapeseed oil
- 2 1/2 ounces cream cheese
- 2 Tbs. powdered sugar
- 1/2 tsp. peppermint extract
- 1/4 tsp. kosher salt
Brownie Pie Filling
- 4 1/2 ounces 72% chocolate
- 6 Tbs. unsalted butter
- 2 eggs
- 3/4 cup sugar
- 1/4 cup flour
- 3 Tbs. cocoa powder
- 1/2 tsp. kosher salt
- 1/2 cup heavy cream
Mint Glaze
- 1 ounce white chocolate
- 2 teaspoons grapeseed oil
- scant 1/8 teaspoon peppermint extract
Instructions
Thin Mint Crust
- Toss the thin mint crumbs, milk powder, sugar, and salt with your hands in a medium bowl to evenly distribute your dry ingredients.
- Whisk the butter and heavy cream together. Add to the dry ingredients and toss again to evenly distribute. The butter will act as a glue, adhering to the dry ingredients and turning the mixture into a bunch of small clusters. The mixture should hold its shape if squeezed tightly in the palm of your hand. If it is not moist enough to do so, melt an additional 1 to 1 1/2 tablespoons butter and mix it in.
- Eat immediately, or deploy as directed in a recipe. The crust is easiest to mold just after mixing. Stored in an airtight container, thin mint crust will keep fresh for 1 week at room temperature for 1 month in the fridge or freezer.
Cheesecake Filling
- Combine the white chocolate and oil in a microwave-safe dish and gently melt the mixture on low for 30 to 60 seconds. Use a heatproof spatula to stir the chocolate and oil together, working until the mixtures is glossy and smooth.
- Combine the cream cheese and powdered sugar in the bowl of a stand mixer fitted with the paddle attachment and stir together on medium-low speed for 2 to 3 minutes to blend. Scrape down the sides of the bowl.
- On low speed, slowly stream in the white chocolate mixture. Mix for 1 to 2 minutes, until it is fully incorporated into the cream cheese. Scrape down the sides of the bowl.
- Add the peppermint extract, salt, and food coloring and paddle the mixture for 1 to 2 minutes, or just until it is smooth and leprechaun green. (You may need to scrape the bowl down once mid-mixing.) No point in making ahead – you don’t have any use for it otherwise and it will make it trickier to swirl in later.
Brownie Filling
- Dump 1 1/4 cups thin mint crust into a 10-inch pie tin and set the remaining 1/4 cup to the side. With your fingers and the palms of your hands, press the crust firmly into the pie tin, covering the bottom and sides of the pan completely. Wrapped in plastic, the crust can be refrigerated or frozen for up to 2 weeks.
- Combine the chocolate and butter in a microwave-safe bowl and gently melt them together on low for 30 to 50 seconds. Use a heatproof spatula to stir them together, working until the mixture is glossy and smooth.
- Combine the eggs and sugar in the bowl of a stand mixer fitted with the whisk attachment and whip together on high for 3 to 4 minutes, until the mixture is fluffy and pale yellow and has reached the ribbon state. (Detach your whisk, unk it into the whipped eggs, and wave it back and forth like a pendulum: the mixture should form a thickened, silky ribbon that falls and then disappears into the batter.) If the mixture does not form ribbons, continue whipping on high as needed.
- Replace the whisk with the paddle attachment. Dump the chocolate mixture into the eggs and briefly mix together on low, then increase the speed to medium and paddle the mixture for 1 minute, or until it is brown and completely homogeneous. If there are any dark streaks of chocolate, paddle for a few seconds longer, or as needed. Scrape down the sides of the bowl.
- Add the flour, cocoa powder, and salt and paddle on low speed for 45 to 60 seconds. There should be no clumps of dry ingredients. If there are any lumps, mix for an additional 30 seconds. Scrape down the sides of the bowl.
- Stream in the heavy cream on low speed, mixing for 30 to 45 seconds, just until the batter has loosened up a little and the white streaks of cream are fully mixed in. Scrape down the sides of the bowl.
- Detach the paddle and remove the bowl from the mixer. Gently fold in the 45 g (1/4 cup) thin mint crust with a spatula. (These crumbs will add little bursts of flavor and texture into the pie filling.)
Mint Glaze
- Combine the white chocolate and oil in a microwave-safe dish and melt the chocolate on low for 20 to 30 seconds. Use a heatproof spatula to stir the oil and chocolate together, working until the mixture is glossy and smooth.
- Stir in the peppermint extract. (If you are using food coloring, stir it in here too.)
Assembly
- Heat the oven to 350 degrees F.
- Pour the mint cheesecake filling into the prepared pie shell. Pour the brownie batter on top of it. Use the tip of a knife to swirl the batter and mint filling, teasing up streaks of the mint filling so they show through the brownie batter.
- Sprinkle the mini chocolate chips into a small ring in the center of the pie, leaving the bulls eye center empty. Sprinkle the mini marshmallows into a ring around the ring of chocolate chips.
- Bake the pie for 25 minutes. It should puff slightly on the edges but still be jiggly in the center. The mini chocolate chips will look as if they are beginning to melt, and the mini marshmallows should be evenly tanned. Leave the pie in the oven for an additional 3 to 4 minutes if this is not the case.
- Cool the pie completely before finishing it. (You can speed up the cooling process by carefully transferring the pie to the fridge or freezer directly out of the oven if you’re in a hurry.
- Make sure your glaze is still warm to the touch. Dunk the tines of a fork into the warm glaze, then dangle the fork about 1 inch above the bull’s eye center of the pie.
- Transfer the pie to the fridge so the mint glaze firms up before serving – which will happen as soon as it’s cold, about 15 minutes. Wrapped in plastic, the pie will keep fresh in the fridge for up to 1 week or in the freezer for up to 2 weeks.
Notes
Recipe from the Milk Bar cookbook.